How To Install Kitchen Cabinets | Yourself | On Concrete Walls | On Drywall | On Uneven Floor | Without Studs | Over Baseboard Heating
How to Install Kitchen Cabinets by Yourself?
If you're doing it alone, installing kitchen cabinets may seem like a difficult undertaking. However, you may produce results that look professional if you have the correct equipment, supplies, and guidelines. We'll lead you through every step of installing kitchen cabinets on your own in this in-depth guide, including how to deal with tricky situations like installing cabinets on drywall, concrete walls, uneven floors, over-baseboard heating, and even spaces without studs. These steps will provide you all you need to completely revamp your kitchen.
Tools and Materials You Will Need
Prior to beginning the installation process, assemble the essential equipment and supplies:
- Measuring tape
- Level
- Stud finder
- Drill and drill bits
- Screwdriver
- Cabinet screws
- Shims
- Pencil
- Chalk line
- Cabinet clamps
- Ladder or step stool
- Safety goggles and gloves
Preparing for Installation
Measuring and Planning
- Measure Your Space: To begin, determine the size of the kitchen space where the cabinets are to be placed. Take note of the space's height, width, and depth.
- Make a note of the layout: Mark where the cabinets will be on the wall with a pencil and chalk line. Note where the wall cabinets' bottom line and the base cabinets' top line are.
Dealing with Concrete Walls
You will want extra tools, such as a hammer drill and masonry bits if your walls are made of concrete. This is how to get ready:
- Mark Drill Points: Make a note of the locations where the cabinet screws will be drilled out.
- Drill Pilot Holes: Drill pilot holes into the concrete using a masonry bit and a hammer drill. Make sure the anchors can fit into the holes.
Installing Cabinets on Concrete Walls
- Install Wall Anchors: Drill pilot holes and insert masonry anchors. The cabinet screws will have a sturdy base thanks to these anchors.
- Put the Ledger Board in place: While working, fasten a makeshift ledger board to sustain the cabinets' weight. This board needs to line up with your markings and be level.
- Install the Cabinets: Raise the Cabinet and insert screws into the wall anchors through the Back Panel of the Cabinet. To keep neighbouring cabinets together while making sure they are plumb and level, use cabinet clamps.
- Secure the Cabinets: After the cabinets are in position, take out the ledger board and put extra screws into the wall anchors at the top and bottom of each cabinet.
Installing Cabinets on Drywall
Finding Studs
- Find the Studs: To find the studs in the wall, use a stud finder. Make sure to properly mark their placements.
- Designate Drill Points: Draw attention to the locations on the cabinets where the screws will meet the studs.
Installing Without Studs
Wall anchors made specifically for plasterboard or toggle bolts can be used in the absence of studs where your cabinets are to be installed:
- Install Wall Anchors: To install wall anchors, drill pilot holes, then insert heavy-duty wall anchors or toggle bolts.
- Mount the Cabinets: Raise the cabinets into position, then insert screws into the wall anchors through the back panel of each cabinet.
Handling Uneven Floors
Cabinet alignment issues might be brought on by uneven flooring. Here's how to make sure the installation is level:
- Employ a Level: To find the highest point, place a level on the ground.
- Shim the Base Cabinets: Level the Base Cabinets with Shims. To level the cabinets, place shims beneath their corners.
- Fix the Base Cabinets: After the base cabinets are level, use the previously mentioned techniques to fasten them to the wall.
Installing Cabinets Over Baseboard Heating
Care must be taken when installing cabinets above baseboard heating to preserve airflow and avoid heat damage:
- Measure Clearance: Make sure there is adequate space between the heating unit and the base of the cabinets. Generally speaking, you want a minimum of 1-inch space.
- Employ Heat-Resistant Materials: To stop heat from destroying the cabinets, if at all possible, employ heat-resistant spacers or materials.
- Install Air Vents: To let heat escape, think about adding air vents to the toe kick of the cabinet.
Step-by-Step Installation Process
Preparing the Wall Cabinets
- Mark the Wall: Mark the bottom of the wall cabinets with a chalk line.
- Put the ledger board in place: To support the weight of the cabinets, fasten a temporary ledger board along the indicated line.
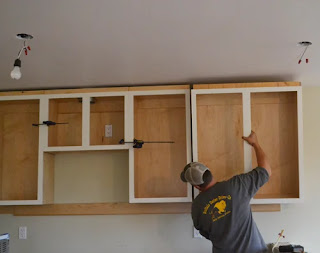
- Install the Cabinets: Take the corner wall cabinet first. Place it on the ledger board after lifting it into position. Drive screws into the wall studs or anchors through the back panel.
- Orient Neighbouring Cabinets: Cabinet clamps are used to hold the cabinets together as you attach the next one. Before screwing them in place, make sure they are plumb and level.
- Take Out the Ledger Board: After every wall cabinet is firmly fixed, take out the ledger board.
Installing the Base Cabinets
- Mark the Layout: Make a mark on the wall at the top line of the base cabinets.
- Position the Corner Cabinet: The corner base cabinet should come first. If needed, level it using shims.
- Secure against the Wall: Drive screws into the wall studs or anchors through the back panel.
- Connect Neighbouring Cabinets: Align the cabinet after it with the cabinet in the corner. After levelling it with shims, clamp it in place and fasten it with screws.
- Verify the Plumb and Level: As you proceed across, make sure each cabinet is plumb and level consistently.
Final Adjustments
- Install The Toe Kick: To install the toe kick, measure the base cabinets and cut the toe kick panels accordingly. Use nails or adhesive to secure them.
- Reattach Doors and Drawers: Reattach the cabinets' doors and drawers. Make that the hinges are properly aligned.
- Install Hardware: Assemble handles, knobs, and other components as needed.
Finishing Touches
- Caulk and Seal: To achieve a smooth appearance, caulk the edges where the cabinets meet the wall.
- Cleanup: Clear the installation area of any dust and debris.
Additional Tips for a Successful Installation
- Safety first: When drilling or working with heavy cabinets, always wear gloves and safety eyewear.
- Double-Check Metrics: Take two measurements, and cut one. Precise measurements are essential to a successful installation.
- Take Assistance If Needed: Cabinets can be heavy and challenging to move by yourself. Never be afraid to ask a friend or member of your family for help.
Conclusion
Your kitchen's use and appearance can be greatly improved by installing kitchen cabinets yourself. It's a pleasant project. The secret is careful planning, accurate measurements, and the correct tools, regardless of whether you're working on drywall, concrete walls, uneven floors, over-baseboard heating, or spaces without studs. You may turn your kitchen into a showpiece by following the instructions provided in this tutorial. Have fun installing it!


Comments
Post a Comment